Showing posts with label Tips & Tricks. Show all posts

Jan 9, 2014

Tips and Tricks. It ain't natural no more

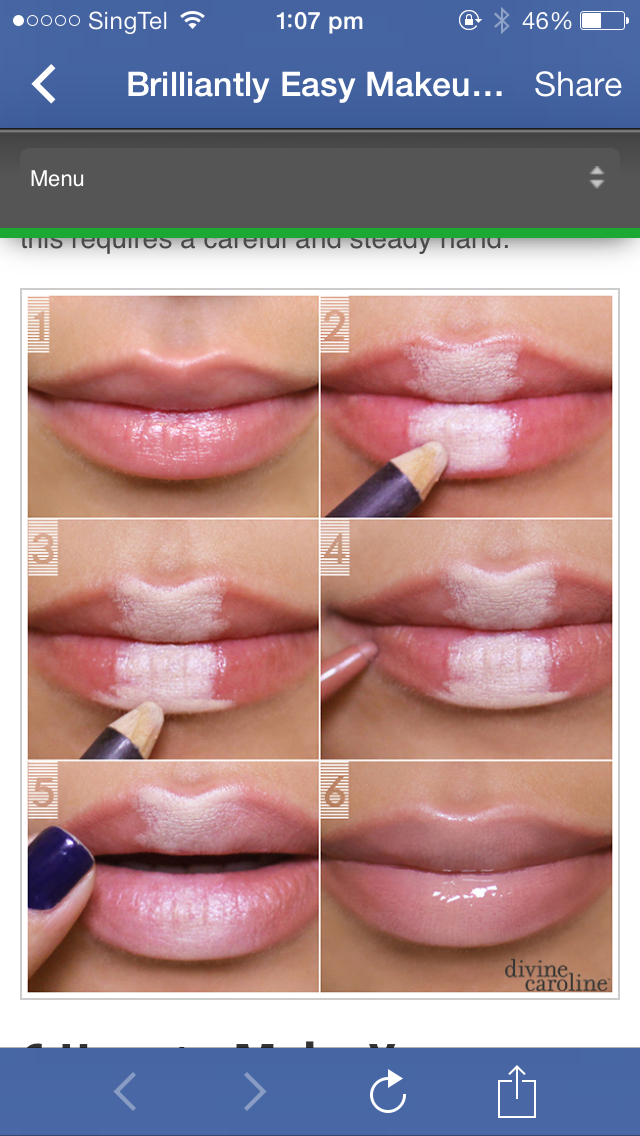
Found these pics on Facebook. So fun. Shows you what some highlighting and shading can do to transform anyone. Great tips and tricks to learn for that hot smoking date you're going for. 


Oct 30, 2013

The French Twist

This is a classic. It's one of those hairstyles that never go out of style, the French twist so easy to do on yourself. And it looks even better with highlights in your hair.


- Posted using BlogPress from my iPad

Let's talk about the Clarisonic again

I've written about the Clarisonic face brush a few times now but I just keep reading about it! And no, they haven't sponsored me or given me money to talk about it haha

But I was reading allure last night and came across this article and found it very helpful with how to use the brush correctly and thought I needed to share it.
Clients ask me what's the best way to prevent breakouts and I always recommend the Clarisonic. It's so simple. The reason we break out is 1. Hormones and 2. Dirt.
Once we sort out the dirt bit, the hormones usually kick in only during pms. So that instantly keeps zits under control.

A definite win Christmas pressie for your loved ones!


- Posted using BlogPress from my iPad

Oct 3, 2013

This is the BEST BEST BEST mascara in the world!

Girls in favour of clumpy, thick, sexy, spanish lashes, say YAY!!! Believe me when i say you only need 2 coats tops! I promise you!
This 'Better Than Sex' will give you 1,944% more volume! Too Faced, you are awesome and thank you for bringing life back into my eyes!


Mar 18, 2010

Did You Know...

That facial sponges can help prevent breakouts! Yes! Its true! I've been diligently washing my face with these sponges the past 3 weeks and haven't had a single breakout since!
I mean, they're so cheap! Like $3.50 or something like that for 2! All those scrubs that I've been using or deep cleansing washes are all useless without the sponge. And nothing, really, can get  all the dirt and make-up off your face for good. Imagine all the gunk stuck on all that invisible facial hair of yours, aha! That is definitely the culprit!
If you have problem skin like me, go try some facial sponges and see how it works for you!

Mar 5, 2010

That yucky thing called Dandruff!

I've been having this really annoying itchy scalp and dandruff lately and was found out by Cleo's beauty Editor Miss Cynthia Chew! Eeps! So embarrassing!! So she recommended me to this Phyto Hair Spa at Wheelock place to get it sorted out. I, however remembered using this brand a long time ago when it was sold exclusively to salons and called Phytologie.
It was really really good and decided to just go to the Pharmacy (it sells in all major pharmacies now) and get some products for help.
I checked out the website for the spa and it was going to cost $108.00, which really, isn't too bad for a treatment.
But that was going to be my last resort, cause really these spas and facial places are always trying to sell you packages and products! The products I don't mind, cause I will definitely use, but I really don't like the idea of packages! They cost a bomb and then get forgotten and not used or expired...the list goes on! And then I end up having to waste all this energy trying to fend them off!

Anyway, back to the shampoo, ONE WASH was all it took la! I first applied the shampoo onto my scalp and left it on for half an hour and then lathered and washed off.
This is so good for hair! All natural botanical ingredients and none of that shit perfumes and wax, my scalp is squeaky clean once again! And I don't have to go through anymore embarrassments, phew!

But if you are one of those who love packages and have dandruff or thinning hair, maybe you should check out the Phyto spa!
Go to: http://www.phytohairspa.com.sg/phytohairspa.html

I just read this article on BellaSugar and it says the temperature of your water can be the cause of your itchy scalp and Dandruff!

It says: hot water takes moisture out of the skin, stripping the hair and skin of natural oils. Couple this with frequent shampooing, possibly harsh ingredients, and dry air, and you'd be scratching your noggin, too!

So try cooling it and see if that works first!

Mar 4, 2010

Getting it right!

-->


Beauty Tips and Tricks:
Sexy Eye Shadow

Achieving that Smokey, Smoldering look (like my ICON Magazine spread I did awhile back featured above) depends on the right tools you choose to use.  The shape and size of your brush can help tremendously with Blending and Contouring (Shu Uemura’s Eye Shadow brush no.14 is a personal favorite of mine!). It cuts my blending time in half and helps create a nice soft shadow on the Eyelid, also bringing out the contours of eyes. Always brush your Eye Shadow from the outside inward towards your nose bridge; this will help lift the eyes. Doing so in the other direction might cause eyes to look droopy and sad.


After applying the Eye Shadow all over your eyelid, take a sponge tip applicator and apply a darker shade of color close and above your lash line  (a little on your lower lash doesn't hurt too). This effect will also make your lashes look fuller and help ‘open’ up your eyes.  Shu Uemura’s brushes are one of my personal favourites. Some of my brushes are 15 years old and it’s still in tip top condition and working its wonders! 


And not forgetting the most important, Eyeliner and Mascara! Without these 2, Eyeshadow will be dull and lack-lustre. ONLY use waterproof! Its a pain getting it off but would you rather smudge like a grunge rock chick or put in a few extra dollars for that good old reliable remover? 
Try Benefit's BadGal Waterproof Eyeliner! I Like!


Jan 10, 2010

The Natural Beauty Workshop


Look what I found Online! A really interesting Malaysian Blog site (http://www.naturalbeautyworkshop.com/my_weblog/making_natural_skincare_products/) teaching you the ways of making beauty products naturally, oh what fun!

From Making your own sugar scrubs to lipbalms and even your own natural body powder!
What really caught my eye were these do-it-yourself powder puffs, they are just too nice!!! I have to attempt one!

To make your own powder puff you'll need the following supplies:
  • 1 8" x 8" swatch of plain Cotton, Terrycloth, or Bamboo Fabric
  • 1 8" x 8" swatch of Fleece or another fuzzy textured Fabric
  • 1 6" - 8" long piece of Ribbon
  • Cotton or Synthetic Batting
Creating a powder puff is easy.  Simply follow the simple sewing instructions below:
  • Trace a 6 inch circle onto both pieces of Fabric, then cut them out.
  • Sandwich the Ribbon between the two circles and stitch most of the way around the outer edges, leaving about an inch of the circle open.
  • Turn the circle inside out and stuff it with batting.
  • Using a slip stitch, close the opening on the puff.

Aug 28, 2007

The Trauma of Eyelash Extensions


Yes, it looks great and sexy and it does your eyes wonders. It's supposed to last 3 weeks. 3 weeks of great looking eyes! You might think some discomfort is all worth it, but you're wrong!
I just got home from removing mine.

After 4 days of beautiful looking eyes, I woke up 2 nights ago with an eye infection. From 4am I was stuck in the bathroom using whatever eye solutions I could find to get rid of this intense itchy and stinging sensations my eyes were feeling but to no avail.

I tried making an appointment with a very irresponsible beautician (named Carol) from China who works through a boutique in Far East Plaza (#04-01) and pleaded with her to come in on her day off as I was in severe discomfort but she refused to budge. So I had to endure another day of infection being too embarrassed to go to the Doctor as I knew the scoldings I was going to receive from him.

So today comes and I'm on time waiting for Carol but she's an hour and a half late. The boutique owner starts to feel the pressure from me and decided to introduce me to another shop round the corner (called Charm) who also had the same services.

To cut the story short, I'm now home with swollen eyelids and a bald right eye. I left Far East Plaza in tears and swear to never introduce any client of mine to go for it.

Lesson learnt. Painfully and tearfully

Jul 23, 2007

Perfect Foundation Brush


This is such a perfect Foundation Brush from Benefit. I am really glad this brand is here in Singapore. It's so quirky and fun! It makes make-up fun! Kind of reminds me of playing house when we were little girls.
I like using the Foundation Brush most as it's the cleanest, easiest to wash and dries in no time. A real no fuss. It also uses very little foundation for more coverage, the less is more concept. Great for liquids, creams or cake foundation.

Jun 21, 2007

Tips and Tricks- Getting a Spouse


The Love Wish

I have to share this with all of you! While I was single, I had alot of free time and read all sorts of books. Everything from trashy romance novels to crime to comics, astrology and feng shui. I was a fan of Lillian Too. She's a very famous feng shui expert from Kuala Lumpur and has written so many books on feng shui.

In one of her books titled Irresistible Feng Shui Magic, was a topic on finding one's true love. I've always felt Singapore to be very couple oriented, like it's almost not very single 'friendly' and honestly felt slightly awkward and lonely even though i was surrounded by wonderful friends. So from the 'society' pressure (or maybe it was just me who felt this way?) and the fact that I'm not getting any younger!, I decided to do something about it : )

I started focusing my energy into finding myself a wonderful man I could spend the rest of my life with. I had to be extremely sure, mind you! I wasn't going to just jump into the next relationship that came along, I promised myself that.

So I came across this article in the book about a Silver Box with peony motifs sybolizing love that can hold one's wishes for the perfect soul mate! It's not very easy finding a Silver box with peony motifs, and had to do one myself. Painting peonies (using oil paint) on an old silver box. I put my heart and soul into painting that box! After that was done, I sat down and started to think very long and hard what I was looking for in the man of my dreams. Stuff like how he must love animals, be patient, handsome, accept me for who I am... that sort of stuff.

I folded that note, put it in the box with a rose quartz and tucked it safely under the southwest corner of my bed. (my box was a square box, but if you got a round box, you should put it in the northwest corner). Voila! Not long later (about 6 months i think) The magic happened and my husband fits the bill to a tee!

Sometimes it could just be you, wishing and dreaming long and hard for something you really really want and it'll manifest! It's just how much you believe in something for it to work! No harm taking a chance right?

Jun 19, 2007

Tips and Tricks- Eyeliners


Eyeliners


There are different ways of applying eyeliners. Pencils, with Eyeshadows using a Sponge Tip or Brush and of course the most difficult (and scary!) Liquid Eyeliner.

Pencils are the easiest, of course but they also smudge and smear the easiest. Someone has however invented the waterproof pencil eyeliner! It's not a gimmick, I can definitely assure it really works! But the line that you'll be drawing with it won't be a thin line like the liquid eyeliner can achieve. Neither will it be a glossy black line (it's usually a matte black 2mm line you get from a pencil). So, pencils are best for that sexy grunge all over eyeliner as depicted in the black and white photo on your right.

Eyeshadow eyeliners need abit more experience as it can get messy and leave you with blotches of powder that escaped the brush onto your cheeks, or worse still, right under your eyes causing you to look like you haven't slept in 2 weeks! This is where the fan brush comes in handy! With light strokes, brushing away the fallen powder from the inside of your cheeks outwards. Eyeshadow eyeliners however don't work without a base (your foundation and powder) as there's nothing to hold the powder to your skin. But it does create a very nice soft line, almost like a smokey effect.

As for the frightening Liquid eyeliner, my trick is to NEVER use the brush it comes with! That brush needs hands of steel! Hands that have never trembled in their lives! Here's my trick: I use a steady thin flat square brush to help me achieve a nice straight thin line! I brush on the liquid eyeliner onto the ends of the brush and start from the middle of the eye slowly working my brush inward and start again from the outer corner working my brush to meet the middle of the line where i started! Soo easy! Just needs practice! Like everything else you are familiar and used to doing in your life, no sweat!

Jun 4, 2007

Foundation Applicators


Cream or Liquid Foundations


Brush, Sponge or Fingertips? All 3 Applicators produce different results.

The Brush uses the least amount of Foundation. It applies Foundation evenly and gives a very nice sheer, smooth finish. There are different sized Foundation Brushes, the bigger ones are for all over and the smaller ones are for spots or contours. For everyday personal use, the big Brush is enough to do the Job. It's also easy cleaning and maintaining. Brush can be washed daily after use and dries in no time. And it's great for Cream or Liquid Foundation!

The Sponge absorbs the most foundation. I find my Foundation going to waste if i use a Dry Sponge, but not as much if my Sponge is Damp. A Sponge can be used a few times, washing it daily after use or discarding it weekly. I like using the Sponge with Cream Foundations. Not so much with Liquid Foundation as it can cause streaking if the sponge is not of good quality. I've found the best Sponge in the world from this Beauty Brand called Alcone. It's been voted by Allure Magazine for the past few years! It's buttery soft, triangle shaped and when soaked in water expands to a very good sized Sponge for an easy grip : ).

And lastly, our fingertips. Cheapest way to apply Foundation! But does it do the trick?
Using our fingertips is the heavier way to applying Foundation. You might use too much or too little. But of course practice makes perfect. It also takes a longer time compared to using a Brush or Sponge.

So I definitely recommend either using a Brush or Sponge as applicators and your fingertips only for spot coverage.

May 30, 2007

Oh that Evil Gadget!


Oh Darling Eyelash Curler!
Oh how we Adore you!

Anyone who gets to know this little Devil will be delighted with it's talent! I promise that you will get the hang of it after some training, so please don't give up.

There are however some very lucky few who really don't need him! It's so ridiculous! Imagine naturally long, Full, Curled Lashes, like some Exotic Flamenco dancer, ooh it makes me so jealous!

But for the rest of us Plebs, here's some tips!

Choosing an Eyelash Curler to suit you can be tricky. Some of us have very Flat Eyelids whilst other could have a very Curved Lid. With Curved Lids, Curlers can't get to the corners so your Lashes end up some Curled and others not, messy!
And the poor flat Lids tend to get clipped most of the time!

My recommendations are:

Flat Lids- Shiseido Eyelash Curler
Normal Lids- Anna Sui Eyelsh Curler
Curvy Lids- Shu Uemura Eyelash Curler

Now what i'm going to tell you is priceless! There actually is a trick to Curling your Lashes! This is a 3 step procedure, guaranteed to make your lashes stay Curled all day long!

1. Place your Curler to the Root of your Lashes, as close as you can get without clipping yourself and gently squeeze a few times
2. Release squeeze and place Curler in the middle of your Lash Length and gently squeeze a few times
3. Release squeeze and place curler near the tip of Lash and gently squeeze

Repeat this procedure a few times and look into the mirror with your face angled 3 quarters. You will see that your Lashes have a natural Curl to it and that it's not sticking up straight towards the sky. Once you've achieved that natural curve, you've GOT TO use a Waterproof Mascara to set the curl!

Remember that non Waterproof Mascaras tend to be heavier in weight so your curl will never stay! And please don't ever put Mascara before Curling as it'll most likely rip your lashes out!

May 28, 2007

Let's start with the Basics


Brushes!

Making an investment in high quality tools is essential. It's actually more cost friendly buying an expensive brush to last you the years then to buy a lousey one that would probably last you maybe up to 6 months, depending how you use and abuse them. I have approximately 70 brushes that i have on hand everytime i work. Most of them have lasted on average 6 years! And they're still going strong with care!

I have to stress that it's very very important to care for your brushes and to please keep them clean! Brushes harbor alot of dirt and bacteria, which causes breakouts and cause your make-up to go onto your skin clumpy. Badly blended make-up is obvious! And it looks nasty!

Ideally, you should wash any brush that you use for liquid make-up (including concealer, foundation, lip products, cream shadows, and so on) every other day (or every week if you're lazy!). For brushes you use on powder, you can clean them every two weeks.

I love washing my brushes with pantene shampoo for dry and brittle hair! Ooh the texture it leaves the bristles and how smootly it glides on your face! If you're a little more hardworking, i'd suggest using shampoo then conditioner. Just the regular stuff you use for your own hair. But don't fret lazy ones! There's actually brush cleaner products (japonesque.com has my favourite one!) you can get that you only have to spray on and wipe the brush with a tissue and all the make-up will come straight off! But please! That doesn't mean you can go without washing your brushes forever! Pamper your brushes and they will pamper you back!

For tips on cleaning your brushes:

1. Gently run your make-up brushes under lukewarm water. Swish them around in the sink until the water runs clear. Hold the brush under the water with the handle pointing up so that you don't irreparably damage the brush.

2. Add a small amount of shampoo to the palm of your hard and swish your brush around in your hand and then under the water.

3. Rinse your hand and the brush thoroughly, then wring out the water from the brush's tip. To retain the shape of the brush hair, gently squeeze to remove all traces of soap and water and place them so they can dry flat on a clean dry towel to dry.

Tips and Tricks


I get asked all the time to lend some tips and tricks from editors, friends and clients. The aim of my blog is being able to put my thoughts and tips down every time one springs to mind. Make-up is really fun and girlie, we all love playing with it. But sometimes it can be intimidating! For example a waterproof liquid eyeliner! Or a metal pinching Eyelash Curler! Yes, beauty comes with pain. No pain no gain but please! there’s many different levels of pain, so stop being so silly!
I hope with this blog i will be able to share my trade with you. To guide you with little beauty anxieties and to prevent you from hurting yourselves!